

If you’re new to the world of programming and visual/no-code development, what’s a better way to learn than by building.
In this blog post, we’ll walk you through the step by step process of building a Weather App complete with:
Along the build, you’ll familiarize yourself with AI-powered no-code development tools and learn the best practices to build a secure application.
Let’s get started:
The first step is to create your WeWeb account.
WeWeb is a no-code web app builder with AI at its core. You can build applications using natural language prompts while retaining full control using the powerful visual editor.
If you haven’t already, feel free to create a free WeWeb workspace by signing up.
To build your weather app, prompt the AI to generate the page layout.
WeWeb makes it easy to get started by combining AI with no-code tools. Instead of starting from a blank page, you can ask the WeWeb AI to generate the initial page layout for you.
.png)
Using natural language or an image as input, WeWeb AI can quickly generate a responsive layout.
Since we'll be using the Weather API (a free API that provides real time weather data), it's important to specify this in our initial prompt so the AI structures the app accordingly.
Once the AI generates the app design, the next step is to set up the search functionality. This will allow users to input a city and retrieve the city’s live weather data.
WeWeb AI suggests the required logic as a task in the ‘Task Manager’.

Simply hover over the suggested task and execute it.
With a single click, the AI generates the workflow to fetch weather data based on the user’s input city.
To test this workflow update your Weather API key in the API call action that it suggested to fetch the live weather.
Before we test the workflow, we need to connect to the Weather API:
1. Sign up at Weather API and fill in your details to create an account.

2. Once you're signed in, copy your API key from the dashboard.

Now, let’s update the API key in the workflow that WeWeb AI generated:
1. If your workflow isn’t already open, switch to Edit mode, then go to the Workflows tab for the Search Form element.
.png)
2. Find the "Fetch Weather Data" Action suggested by the AI and replace the placeholder API key with your own.

3. You're all set to test the workflow! Enter a city name into the input field to see the weather forecast.

If things don’t work as expected, double-check the following:
1. Make sure the Search button is set as a Submit button.

2. Confirm that the input value from the city field is correctly passed into the "Fetch Weather Data" Action.

With our weather API call set up, we need to ensure that our Weather API key remains secure.
If we were to use Rest API or raw JavaScript to make the API request, our API key would be exposed on the frontend.
This means that any user could see it and potentially misuse it.
To secure our API keys, we need to make these calls from the Backend. We'll integrate Supabase (a low-code backend) and leverage its Edge Functions.
Inside the WeWeb editor, navigate to the ‘Back-end’ tab and click on ‘Add Supabase’ to connect your account.

You can connect your existing Supabase account or simply sign up for a free account using your GitHub or Email credentials.

Authorize WeWeb to grant the necessary permissions to access your Supabase account.

Back in WeWeb, you’ll notice that your account is connected. Create a new project and click on ‘Create Project.

Edge Functions allow you to securely make API calls to external services from the Supabase backend, preventing API keys from being exposed on the frontend
This ensures that our Weather API key is protected while still allowing users to retrieve weather data.
With Supabase integrated, we can simply prompt the AI to create an Edge Function that will handle the API call in the backend.

WeWeb AI leverages the Weather API to create an Edge Function in Supabase. It will prompt you to provide your Weather API key. Simply follow the step-by-step instructions to retrieve it.

Once you have the key, input it to the AI, and deploy the Edge Function with a single click.
Once deployed, the Edge Function securely handles API calls and fetches live weather data without publicly exposing your key.
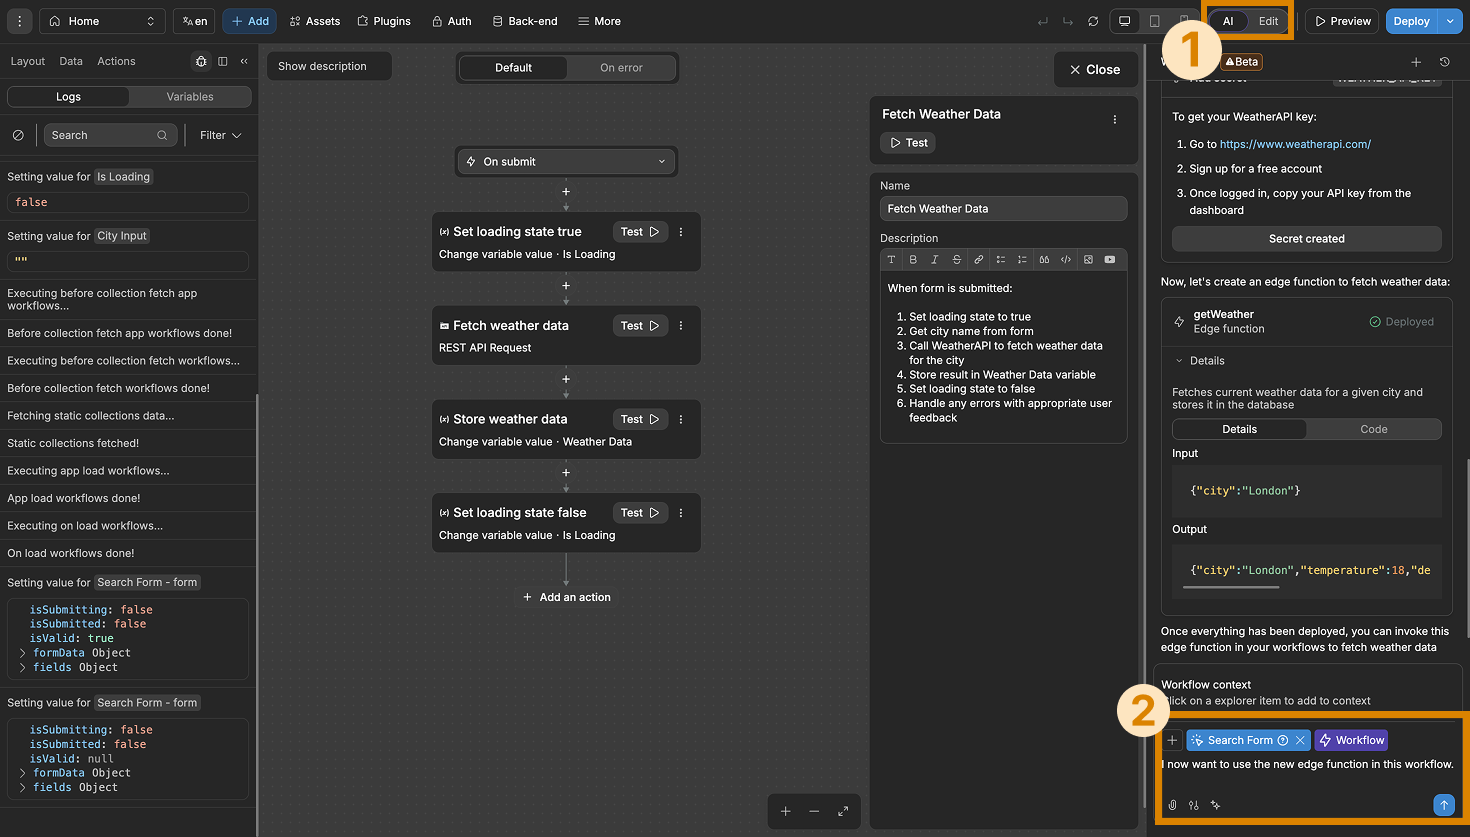
Now that our secure API call is set up, we need to modify our search workflow to use the newly created Edge Function instead of making a direct API request.
Again, we can simply prompt the AI to update our workflow, and it will handle the necessary changes automatically.
1. If your workflow isn’t already open, switch to Edit mode, then go to the Workflows tab for the Search Form element.
2. Return to AI mode and enter the prompt to continue.
Great work! You’ve successfully built a secure, responsive weather app with WeWeb AI and Supabase. This is just the beginning.
With the combination of WeWeb AI and the visual editor, you can:
The possibilities are endless.
Master no-code development by exploring the WeWeb Academy and building a ticketing system from scratch.
Sign up now, pay when you're ready to publish.


.jpeg)


